給自己看的 JavaScript 進階 - 物件導向
— 程式導師計劃, coding 筆記, JavaScript — 10 min read
給自己看的 JS 進階:(建議按照順序看) 給自己看的 JS 進階-變數 給自己看的 JS 進階-Hoisting 給自己看的 JS 進階-Closure 給自己看的 JS 進階-物件導向
什麼是物件導向
從剛剛的例子開始說吧:
function createWallet(init) { var money = init return { add: function(num) { money += num }, deduct: function(num) { money -= num } }, getMoney() { return money }}
var myWallet = createWallet(99)myWallet.add(1)myWallet.deduct(10)console.log(myWallet.getMoney()) // 90這個例子中回傳的值是一個物件,其實就算是物件導向。在使用 JS 時,也時常不是直接 call 一個 function ,而是對某個物件做操作,這種做法的好處是方便模組化。
class
從 ES6 的 class 開始談起。
首先, class 的名稱一定是大寫開頭,例如:
class Dog { sayHello() { console.log('hello'); }}class 有點像設計圖,當我們實際使用前時,要用 new 將 class 實體化 (instance):
var d = new Dog();d.sayHello(); // hello另一個概念是 this ,它會指向呼叫它的東西:
class Dog { setName(name) { this.name = name; } getName() { return this.name; }}
var d = new Dog();d.setName('jojo');console.log(getName()); // jojo上面範例中 d.setName('jojo') 中的 this 因為是由 d 呼喚的,因此 this 當然就指向變數 d 。
class 中 setName(name) 這樣的函數被稱為 setter ,讓裡面存取到外面的值;而 sayHello() 則叫 getter ,是讓外面得到 class 的值。 另外我們也可以直接這樣寫:
d.name = 'dio';console.log(d.name); // dio但還是建議用 setter 和 getter 。
如果想要用像是函式傳參數的方式設定,可以用 建構子 constructor:
class Dog { constructor(name) { this.name = name; } getName() { return this.name; }}
var d = new Dog('jojo'); // 字串 'jojo' 被傳入 constructor() 中console.log(getName()); // jojo
var d = new Dog('dio');console.log(getName()); // dioES5 的 class
在 ES5 中沒有 class ,因此要這樣寫:
function Dog(name) { var myName = name return { getName: function() { return myName }, sayHello: funcrion() { console.log(myName) } }}
var d = Dog('jojo')d.sayHello // jojo
var b = Dog('dio')d.sayHello // dio不過因為每次都是呼叫一個新的物件,會出現這種狀況:
console.log(b.sayHello === d.sayHello); // false不過兩個是同個 function ,所以共用同個 function 比較省記憶體吧?
因此在 ES5 中,可以將 function 當作 constructor 用:
function Dog(name) { this.name = name;}
var d = new Dog('abc');console.log(d); // Dog { name: 'abc' }自動變成物件了!
不過這樣要怎麼知道是 constructor 還是平常�的 function?只有加 new 才會被認定是 constructor ,如果沒加就是 function 。
設定屬性的問題搞定了,但要怎麼設定輸出名字和其他操作ㄋ?這時候可以把東西掛在 .prototype 上:
Dog.prototype.sayHello = function () { console.log(this.name);};
var d = new Dog('jojo');d.sayHello; // jojoPrototype
JavaScript 中,每個變數都有個隱藏屬性 __proto__ ,暗示如果在 d 上面找不到 sayHello 的屬性:
function Dog(name) { this.name = name;}
Dog.prototype.sayHello = function () { console.log(this.name);};
var d = new Dog('jojo');d.sayHello; // jojo
console.log(d.__proto__);// Dog { sayHello: [Function (anonymous)] }// 其實就是 Dog.prototype當我們呼叫 d.sayHello 時,我們其實是做了:
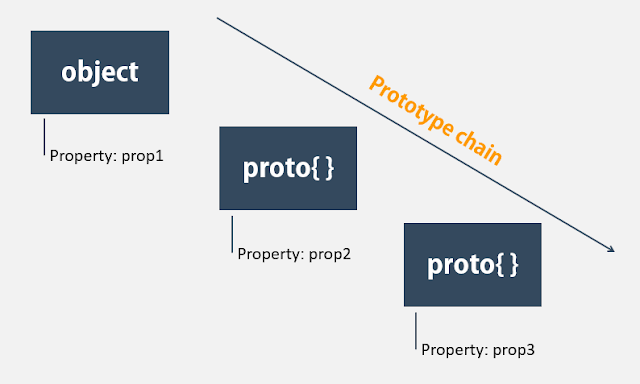
d本身是否有sayHellod.__proto__是否有sayHello,也就是Dog.prototype- 沒有的話就找
d.__proto__.__proto__,也就是Object.prototype - 如果還是沒有就找
d.__proto__.__proto__.__proto__,沒有的話會回傳 null。 - null 代表找到頂了,沒有的話就會拋出錯誤。
以上都是只要有就會回傳值,沒有的話才往下進行,這個步驟被稱為原型練(Prototype Chain)。

我們來看一下:
console.log(d.__proto__);// Dog.prototype// 結果:Dog { sayHello: [Function (anonymous)] }console.log(d.__proto__.__proto__);// Dog.prototype.__proto__// Object.prototype// 結果:{}console.log(d.__proto__.__proto__.__proto__);// null他們之間的關係如下:
d.__proto__ = Dog.prototype;d.__proto__.__proto__ = Object.prototype;Dog.prototype.__proto__ = Object.prototype;因此我們也可以設定 Object 的 prototype ,這樣就會在第三個步驟呼叫到結果:
Object.prototype.sayHello = function () { console.log('object', this.name);};
var d = new Dog('jojo');d.sayHello; // object jojo如果同時設定 Object 和 Dog 的 prototype ,則會因為原型鍊會先選到 Dog 的:
Dog.prototype.sayHello = function () { console.log(this.name);};
Object.prototype.sayHello = function () { console.log('object', this.name);};
var d = new Dog('jojo');d.sayHello; // jojo同理,此處的 Object 如果被換成 Function ,第四個步驟就會被換成 Function.prototype 。
new 到底做了什麼
function.call() 這個函數可以指定 function 中的 this 值:
function test() { console.log(this);}
test.call(123); // [Number: 123]接著來拆解 new 到底幫我們做了甚麼,因此用另一個 function 來模擬:
function newDog(name) { // 模擬 new 做了一些事情}
// 最後目標var a = newDog('jojo');a.sayHello(); // 印出 jojo- 建立一個 object,並將值傳入
function newDog(name) { var obj = {}; Dog.call(obj, name); // 第一個是 this ,後面依序是傳入值 console.log(obj);}
var a = newDog('jojo'); //{ name: 'jojo' }- 設定 prototype 連結
function newDog(name) { var obj = {}; Dog.call(obj, name); // 第一個是 this ,後面依序是傳入值 obj.__proto__ = Dog.prototype;}
var a = newDog('jojo');- 回傳 object
function newDog(name) { var obj = {}; Dog.call(obj, name); // 第一個是 this ,後面依序是傳入值 obj.__proto__ = Dog.prototype; return obj;}
var a = newDog('jojo');a.sayHello(); // 印出 jojo就完成ㄌ!
Inheritance
設想有一個狗的 class ,今天我需要設定黑狗和白狗,這時有名字、會叫、丟飛盤會去接回來之類的和狗有關的屬性就不用再設定一次了。要是有人問你「黑狗有幾個眼睛」時,只要回頭查看「狗」的條目就可以了。這就是 Inheritance 繼承的概念。
ES6 中的繼承可以這樣寫:
class BlackDog extands Dog{ // 其他黑狗的屬性}
const d = BlackDog('jojo')d.sayHello()上面的例子中 d.sayHello() 實際上是往上找到 Dog 的屬性。
此時若我們想讓黑狗被建立的時候就呼叫 sayHello():
class BlackDog extands Dog{ constructure() { this.sayHello() }}
const d = BlackDog('jojo')這樣會噴錯,因為在 constructor 中呼叫 this 前要用 super() 另外引入上一層的constructor ,如下:
class BlackDog extands Dog{ constructure(name) { super(name) this.sayHello() }}
const d = BlackDog('jojo') // jojothis
this 在物件導向中被使用,可以用代表其所對應到的 instance 。
如果直接呼叫 this 例如:
function test() { console.log(this);}
test();會出現一長串的東西。
若不是物件導向的環境下,預設值為 Global ,node.js 跑是 global 的變數,瀏覽器則是 window 。也可以在檔案最上方輸入 'use strict'; 進入嚴格模式,此時的預設值就會是 undefined 。
另一個例外是使用 DOM 的時候:
document.querySelector('.dom').addEventListener('click', function () { console.log(this); // 點擊到的東西});call 和 apply
.call() 的第一個值被預設為 this 的值:
function test() { console.log(this);}
test.call(123); // [Number: 123]apply 也是:
function test() { console.log(this);}
test.apply(123); // [Number: 123]兩個的差別是後面的參數引入的方法, call 就是用逗號連接,但 apply 只有兩個參數,第二個參數則是將要傳入的參數們用陣列包起來。
怎麼看 this
const obj = { a: 123, test: function () { console.log(this); },};
obj.test(); // this 對應到 obj 本身this 和放在哪裡無關,而是看呼叫的方法。例如以下寫法雖然一樣,結果卻不同:
const obj = { a: 123, test: function () { console.log(this); },};
const func = obj.test;func(); // undefined因為第一個寫法 obj.test() 可被視為 obj.test.call(obj) ,因此會呼叫到 obj 。
bind
小小練習,自己先猜猜看答案:
function log() { console.log(this);}
var a = { a: 1, log: log };var b = { a: 2, log: log };
log(); // globala.log(); // a
b.log.apply(a); // a,因為 call 的值優先如果希望不管怎麼呼叫, this 的值都不會變,可以是用 .bind() :
const bindTest = obj.test.bind(obj);之後不管從哪裡呼叫 bindTest() , this 的結果都是 obj 。
bind 和 call / apply 的差別在於,前者會回傳一個新的 function ,後者則是直接呼叫。
碰到箭頭函式,一切都不一樣ㄌ
使用到箭頭函式時, this 的值和如何呼叫沒有關係,此時的規則和 scope 比較像,也就是和定義在哪裡有關係。
可以看這個例子:
class Test { run() { consoel.log(this); // Test setTimeOut(function () { console.log(this); // unefined }, 1000); }}
const t = newTest();t.run();但如果用箭頭函式:
class Test { run() { consoel.log(this); // Test setTimeOut(() => { console.log(this); // Test }, 1000); }}
const t = newTest();t.run();